
Enter Basement and work toward three objectives
- Choose BASEMENT in the lobby.Select Normal, set party size to 1 for a solo run, then press Create. This is the setup shown at 6:23 in the September 6 walkthrough. Follow the lock shown on your chosen difficulty: the neighboring “2 Wins” control does not mean Normal needs two wins.
- Search the haystack for the key.Collect hay, sell when your bag fills, and return to the pile. Continue searching while working through the lever and puzzle objectives; you can finish the puzzles before finding the key. There is no fixed key coordinate to follow.
- Keep the objective tracker in view.You need Find the Key in the Haystack, Pull all the levers and Solve Puzzles 3/3. A solved keypad alone is not the end of this chapter.
Escape route: three levers → hidden room → crystals, picture and paper code → lasers off → key equipped → ladder → trapdoor. Finding the key is a separate task you can work on along the way.
Need help collecting, selling or upgrading? Use the Farmhouse guide.
Sources: Official universe places · Chapter 2 gameplay source · Watch the lobby setup ↗.
All three lever locations: follow the colored wires
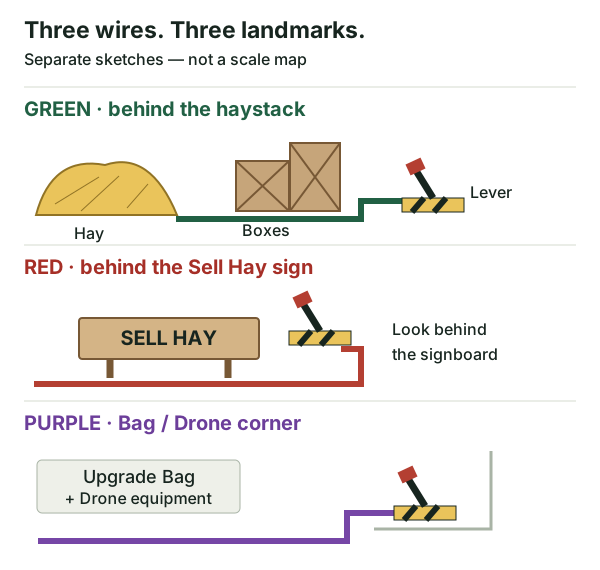
The wire color is the easiest way to distinguish the three levers. Look for a red handle on a yellow-and-black base, move close, then click or use the interaction prompt.
- Green wire — boxes behind the haystack.Go around the hay to the rear corner and look beside the boxes. Follow the green ground wire to the lever.
- Red wire — Sell Hay sign.Go to the Sell Hay cart and look behind its signboard. The red wire leads to this lever.
- Purple wire — Upgrade Bag / Drone corner.Head toward the Upgrade Bag and Drone equipment, then look on the ground in the corner for the purple-wire lever.
What confirms it: after all three interactions, the lever objective checks off and a short scene shows a door opening. Go through that door into the puzzle room. If the door is still shut, revisit all three landmarks and check for a lever you only approached without pulling.
Sources: Pro Game Guides lever locations · Watch the lever search ↗.
Count each crystal color on the walls and ceiling
- Look around the room and up.Count the hanging red crystals, then purple, then green. Include crystals on the walls as well as the ceiling; exclude the three large display crystals on the pedestals.
- Set the matching pedestal numbers.Click the number beneath each colored display crystal until it equals that color's count. Each click increases the number by one.
- Check the lamp and puzzle counter.The filmed first solution shows a green lamp and Solve Puzzles 1/3. If nothing changes, recount the walls and ceiling, then check that you assigned each count to the correct color.
Example, not a fixed combination: if your room contains five red hanging crystals and the red pedestal starts at 0, click its number five times to set it to 5. Count purple and green separately. Counts vary between runs, so copying someone else's three numbers can fail.
Sources: Pro Game Guides crystal instructions · Watch the count rule at 10:13 ↗ · See the green-lamp result at 10:28 ↗.
Rotate the 16 tiles to match the small reference
Click a piece on the large black-and-cream board to rotate it. Your target is the small picture beside the board on the right. The reference below shows an alien-face design: match its lines and features, rather than trying to make a cow.
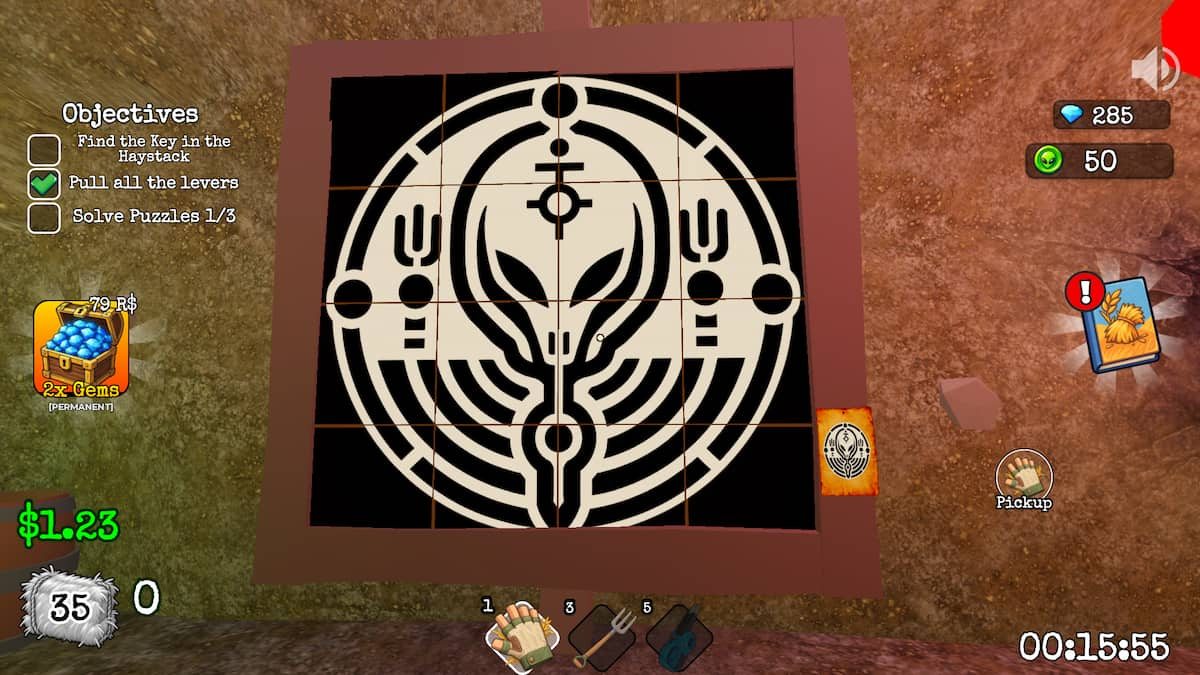
- Start with the circular border.Compare the outer curves with the small reference and turn those tiles until the line continues across their edges. This is a practical solving order, not a required game sequence.
- Align the face and central symbols.Work inward, checking that the eyes, center line and surrounding marks connect across tile joins. Match all 16 pieces to the reference.
- Check that progress registers.If the counter does not advance, inspect joins that look nearly right and compare each tile with the corresponding part of the reference. After crystals and picture, the filmed route shows 2/3.
There is no universal click-count sequence here: use each tile's current orientation and your room's reference.
Sources: Pro Game Guides picture reference · Chapter 2 gameplay source · Watch tile rotation at 10:33 ↗.
Find your code on the back of a paper
- Search the papers on the hidden-room floor.Click a sheet to pick it up, then flip it and read the back.
- Skip an X; keep a four-digit clue.A back marked X is not the password. Check another sheet until you find four digits.
- Enter those digits at the keypad.Go to the keypad across from the picture, enter your paper's number and press the green check.
If 5831 or 9825 fails: stop copying the example and flip the papers in your current run. If your own code is rejected, reread its back and compare all four entered digits. The keypad has a red X control, but the walkthrough does not establish its exact clear/back behavior; check the displayed entry before submitting again.
ALIEN is a reward code for the separate Codes menu. It does not belong on this four-digit keypad. Once the puzzles are done, finish the key-and-trapdoor steps below.
Sources: Watch the paper search ↗ · See the 9825 paper ↗ · Pro Game Guides keypad and escape instructions.
Equip the key, climb the ladder and open the trapdoor
- Finish all three puzzles.Pro Game Guides reports that this frees the alien and turns off the lasers blocking the exit. Check Solve Puzzles 3/3 and the laser state.
- Find and equip the key.If Find the Key in the Haystack remains unchecked, return to collecting and selling hay. Once you have the key, select it so it is equipped; simply finding it is not the final action.
- Go up the ladder to the trapdoor.With the key equipped and the lasers off, climb the ladder and use the key to leave through the trapdoor.
Still unable to leave?
- Hidden room closed: check all three colored-wire levers, including the purple one by Upgrade Bag and Drone.
- Lasers still on: check the puzzle counter. Revisit the unsolved crystals, picture or paper code; finding the key does not solve a puzzle.
- At the ladder with no key: finish searching the haystack. Puzzle completion does not replace the key objective.
- Key found but trapdoor still blocked: select the key to equip it, then check the lever objective, 3/3 puzzles and laser state separately before trying the ladder again.
These checks cover the chapter objectives; no specific server-bug reset fix is established by the linked walkthroughs.
What happens outside? Ending spoilers
In the ending described by Pro Game Guides, the freed alien stands outside, points skyward and a UFO picks up the player. Finished Chapter 2! is the official badge for finding the key and escaping the basement. The separate Find the UFO badge is a different task; seeing this story scene is not a claim that you earned it or unlocked Chapter 3.
Back in the lobby? Find reward codes and their redemption steps. Classes & Gems explains rolls, switching and free reward budgets.
Sources: Pro Game Guides escape steps and ending, September 9 · Official Chapter 2 and UFO badge descriptions · Watch the ending scene ↗.